How to Check Storage on Mac (5 Easy Methods)
Quick Answer
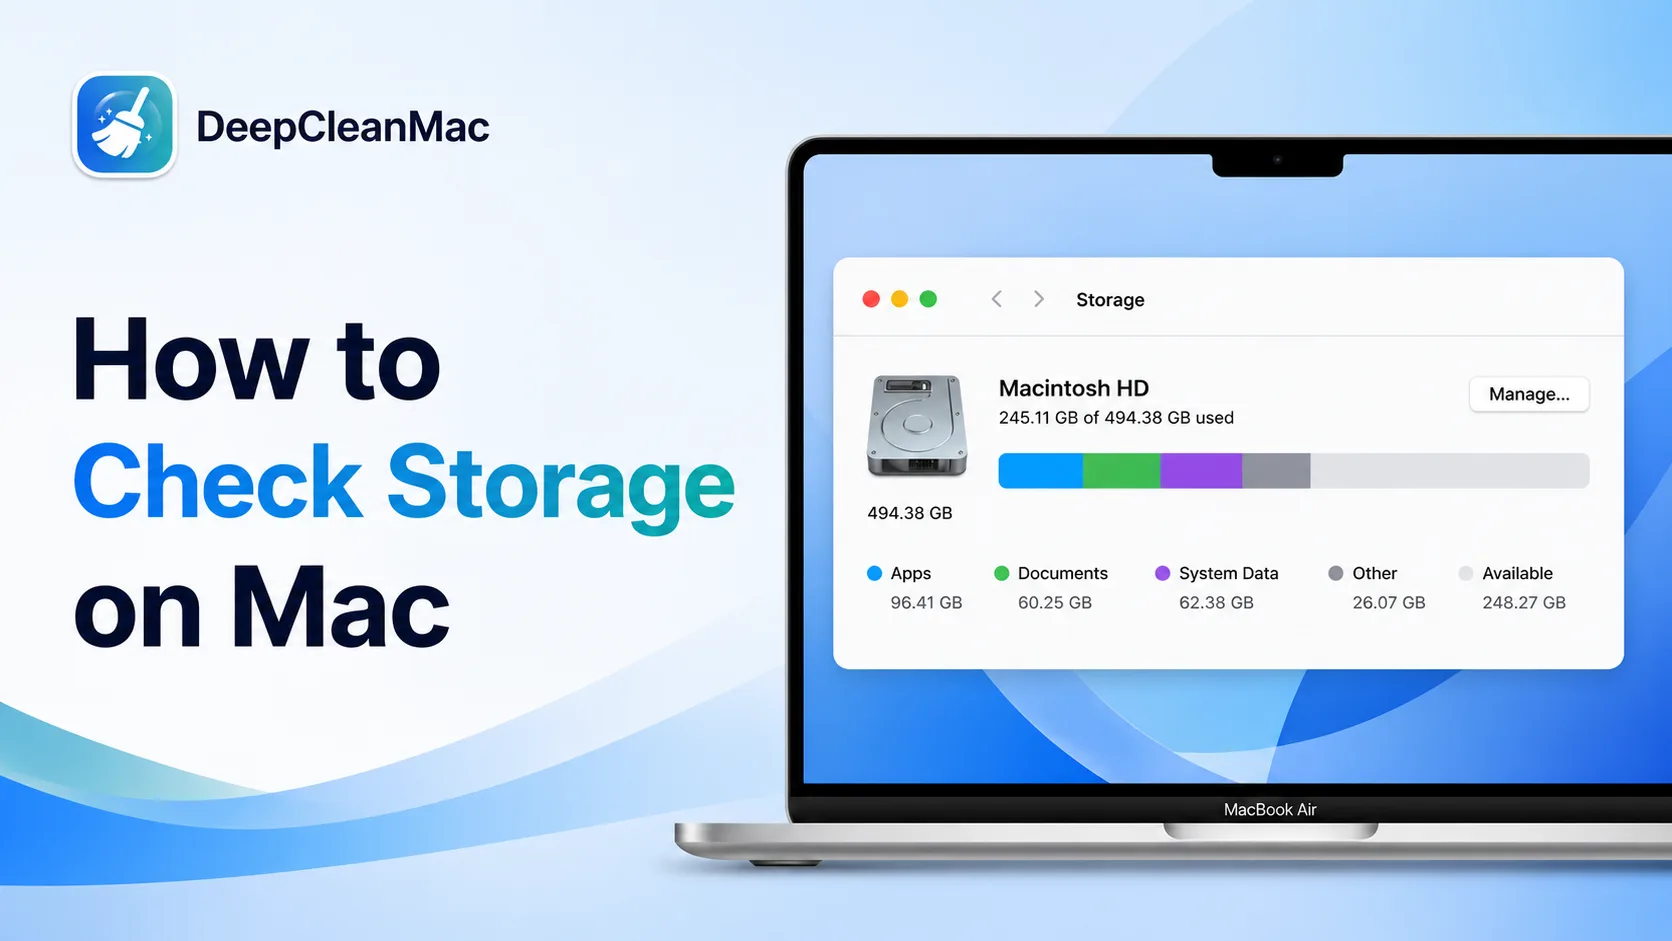
To check storage on Mac, go to Apple menu > System Settings > General > Storage. You'll see a color-coded bar showing how much space Apps, Documents, System Data, and other categories use. On macOS Monterey or earlier, click Apple menu > About This Mac > Storage. For a more detailed breakdown of what's consuming space across 200+ hidden locations, use a tool like DeepCleanMac.
Running low on disk space is one of the most common problems Mac users face. Whether you have a 256GB MacBook Air or a 2TB Mac Studio, knowing exactly how your storage is being used is the first step to fixing it. According to Apple, macOS itself requires at least 35GB of free space to install major updates - and performance starts to degrade when less than 10-15% of your SSD is free. In this guide, we'll walk you through five methods to check storage on your Mac, explain what each storage category actually means, and show you how to reclaim gigabytes of wasted space. Every method is updated for macOS Sequoia (15), Sonoma (14), and Ventura (13).
5 Ways to Check Storage on Mac
Method 1: System Settings (macOS Ventura, Sonoma & Sequoia)
Step 1: Click the Apple menu () in the top-left corner of your screen.
Step 2: Select System Settings from the dropdown menu.
Step 3: Click General in the left sidebar.
Step 4: Click Storage on the right side.
Step 5: Wait a few seconds for macOS to calculate your storage usage. You'll see a color-coded bar showing how space is divided across categories like Apps, Documents, macOS, System Data, and Other.
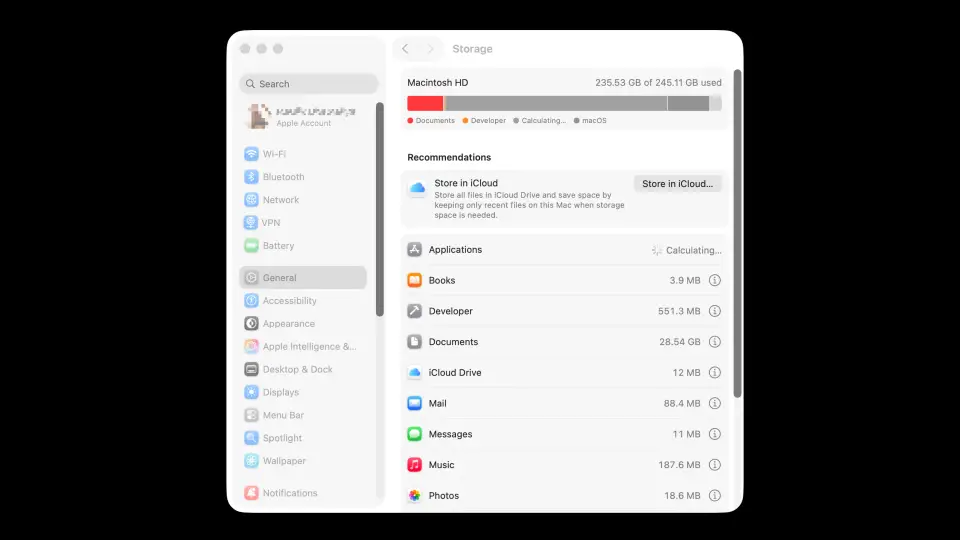
This is the recommended method for macOS Ventura 13 and later. The storage bar may take 10-30 seconds to fully load on Macs with large drives.
Method 2: About This Mac
Step 1: Click the Apple menu () in the top-left corner.
Step 2: Select About This Mac.
Step 3: In the window that appears, you'll see your Mac model, chip, memory, and macOS version.
Step 4: Click More Info… to open System Settings > General, then click Storage to view your disk usage breakdown.
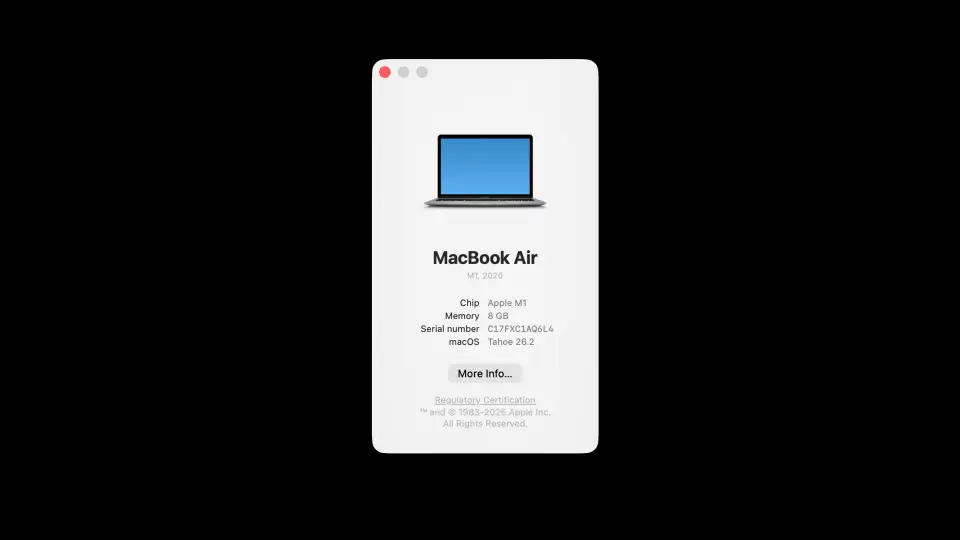
On macOS Ventura and later, About This Mac no longer has a Storage tab - it redirects you to System Settings via the More Info… button. On macOS Monterey and earlier, you'll see a Storage tab directly in the About This Mac window.
Method 3: Disk Utility
Step 1: Open Finder and navigate to Applications > Utilities.
Step 2: Launch Disk Utility.
Step 3: Select your startup disk (usually called "Macintosh HD") in the left sidebar.
Step 4: Look at the capacity, used space, and available space shown at the bottom of the window or in the toolbar.
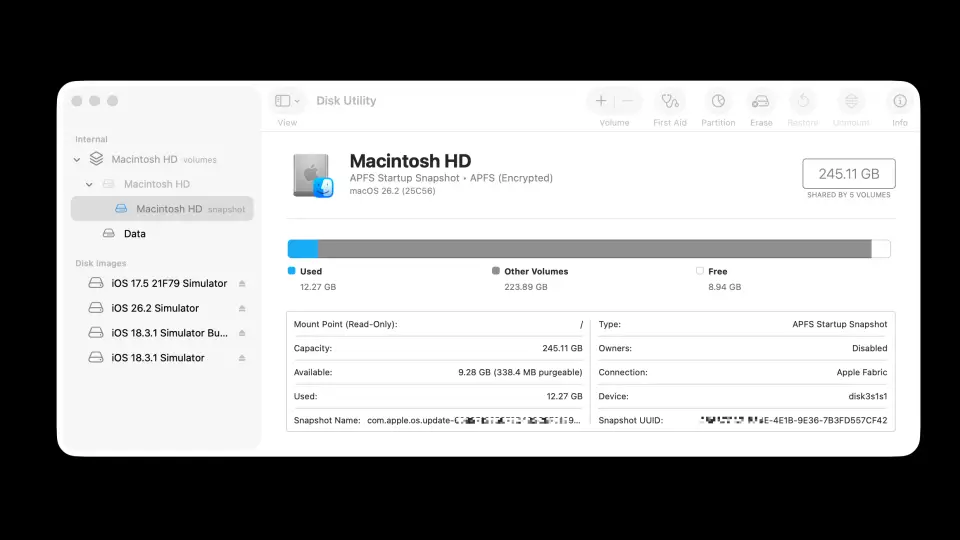
Disk Utility shows the raw disk usage without category breakdowns. It's useful for checking APFS container sizes and verifying disk health alongside storage capacity.
Method 4: Finder Get Info
Step 1: Open Finder and click on Macintosh HD in the left sidebar (or on your desktop if enabled).
Step 2: Press Command + I to open Get Info.
Step 3: Look for Capacity, Available, and Used fields to see your storage numbers.
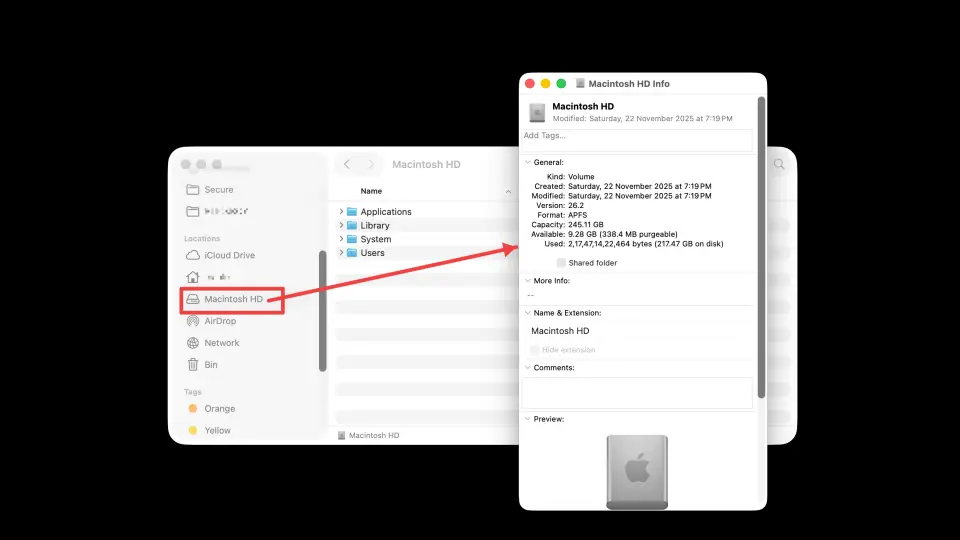
This is the quickest method if you just need to see total vs. available space without a category breakdown.
Method 5: Terminal Command
Step 1: Open Terminal from Applications > Utilities or search for it with Spotlight (Command + Space).
Step 2: Type the following command and press Enter: df -h /
Step 3: Look at the Size, Used, Avail, and Capacity columns for your main disk.
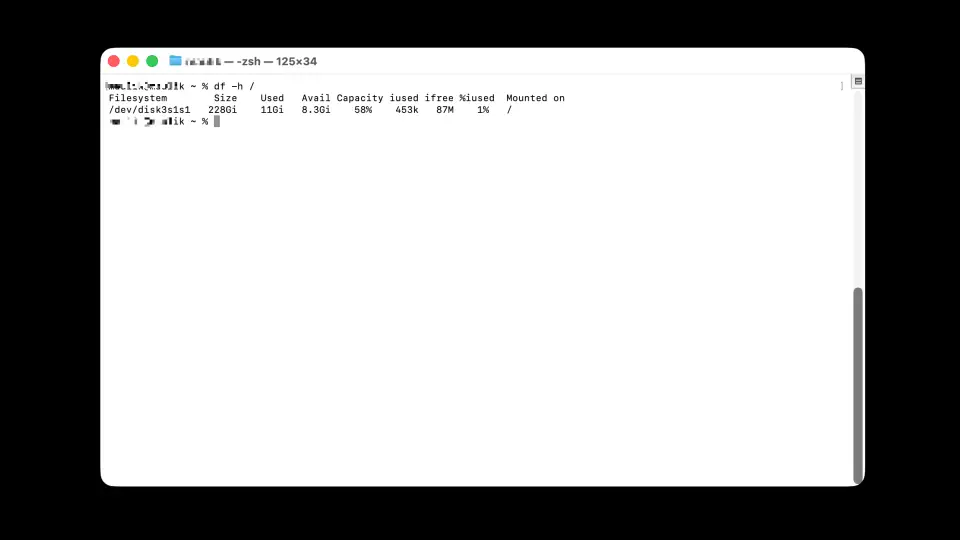
Power users and developers often prefer Terminal for precise storage data. The df command reports APFS volume sizes and shows the exact bytes used - no rounding.
Understanding Mac Storage Categories
When you check storage on your Mac, macOS groups files into color-coded categories. Here's what each one actually means - and whether you can safely reduce it:
| Category | What It Includes |
|---|---|
| Apps | All installed applications including their bundles. Typically 10-30GB. Uninstall apps you no longer use to free space - but drag-to-Trash leaves behind hidden leftovers. |
| Documents | Files in your Documents, Desktop, and Downloads folders, plus any user-created files. Move old files to an external drive or iCloud to reclaim space. |
| macOS | The operating system files. Usually 12-15GB. This cannot be reduced - it's the OS itself. |
| System Data | Caches, logs, temporary files, Spotlight indexes, virtual memory swap files, and Time Machine local snapshots. Often 20-50GB. This is the #1 category where hidden recoverable space hides. Previously called 'Other' on older macOS versions. |
| Other | A catch-all for files macOS can't categorize - plugins, extensions, archives, and miscellaneous data. Can be 5-20GB depending on installed software. |
| iCloud Drive | Files synced or stored locally from iCloud. macOS may show this space as used even when files are offloaded to the cloud. Enable 'Optimize Mac Storage' to minimize local usage. |
What Takes Up the Most Space on Mac?
Based on data from thousands of DeepCleanMac scans, the biggest hidden storage consumers on most Macs are: application caches - especially from Xcode (10-30GB), Docker (20-50GB), Chrome (1-5GB), and Slack (0.5-2GB). Old iOS and iPadOS device backups stored in ~/Library/Application Support/MobileSync can consume 10-50GB each. Time Machine local snapshots accumulate automatically and can use 20-100GB if backups haven't been completed recently. The Downloads folder is another major culprit - most users have 5-15GB of forgotten .dmg installers, .zip archives, and old PDFs. App leftovers from software you've already uninstalled persist in ~/Library/Application Support, ~/Library/Caches, and ~/Library/Preferences - a typical Mac accumulates 2-5GB of these orphaned files. Finally, browser caches from Safari, Chrome, Firefox, and other browsers collectively take up 2-8GB of space. The macOS 'System Data' category often accounts for 30-60% of a Mac's used storage, and most of it is recoverable cache and log data that can be safely cleaned.
How to Free Up Storage on Mac
1. Empty the Downloads folder
Open Finder > Downloads and sort by size. Delete .dmg installers, old .zip files, and documents you've already moved elsewhere. Most users recover 5-15GB from Downloads alone.
2. Clear system and application caches
Caches in ~/Library/Caches and /Library/Caches grow indefinitely. Clearing them is safe - apps regenerate cache data as needed. A Mac that hasn't been cleaned in 6-12 months typically has 5-10GB of stale cache data.
3. Remove old iOS/iPadOS backups
Go to System Settings > General > Storage > iOS Files, or check ~/Library/Application Support/MobileSync/Backup manually. Each backup can be 10-50GB. Delete backups for devices you no longer own.
4. Delete Time Machine local snapshots
macOS keeps local Time Machine snapshots even if you back up to an external drive. To list them, run 'tmutil listlocalsnapshots /' in Terminal. Delete old ones with 'tmutil deletelocalsnapshots [date]'. These can consume 20-100GB on Macs that haven't completed a recent backup.
5. Uninstall unused apps completely
Dragging an app to Trash only removes the .app bundle - preferences, caches, containers, and support files remain scattered across Library folders. Use a complete uninstaller to remove all associated files. A single app can leave behind 50-500MB of hidden leftovers.
6. Optimize iCloud storage
Enable Apple menu > System Settings > Apple ID > iCloud > Optimize Mac Storage. This offloads old files to iCloud and keeps only recently accessed files local, potentially freeing tens of gigabytes on smaller SSDs.
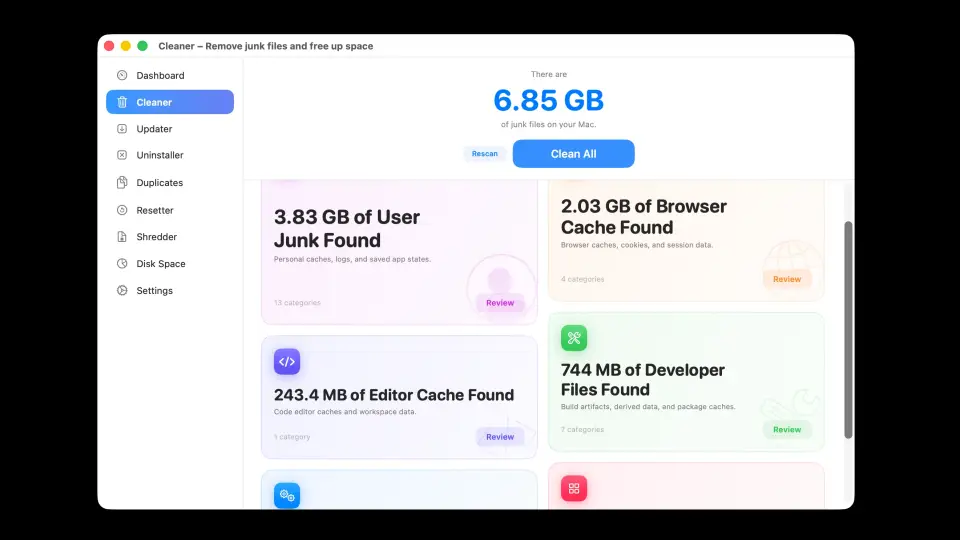
How DeepCleanMac Helps You Manage Storage
macOS shows you a vague color-coded bar with categories like 'System Data' and 'Other' - but doesn't tell you what's inside them or how to clean them. DeepCleanMac scans 200+ hidden system locations that macOS's built-in storage view doesn't surface. It shows you exactly what's consuming space - down to individual cache folders, log files, temp data, and app leftovers - with clear file sizes and safety ratings. One-click cleaning recovers an average of 15GB+ on the first scan. The health dashboard monitors CPU, memory, and disk usage in real time so you always know when it's time to clean. Unlike manual cleanup, DeepCleanMac ensures you never accidentally delete files your Mac needs to function.
Frequently Asked Questions
How do I check storage on Mac without System Settings?
▾
You can check Mac storage using Disk Utility (Applications > Utilities > Disk Utility), Finder's Get Info (select your drive, press Command + I), or Terminal (run 'df -h /'). Each method shows total capacity and available space. For a detailed category breakdown, System Settings is the most informative built-in option.
Why does my Mac say storage is full when it's not?
▾
This usually happens because of hidden files that macOS doesn't show in Finder - system caches, Time Machine local snapshots, virtual memory swap files, and app leftovers. The 'System Data' category can silently consume 20-50GB. These files are invisible in normal Finder browsing but take up real disk space. A cleaning tool like DeepCleanMac can reveal and safely remove them.
What is 'System Data' in Mac storage?
▾
System Data (called 'Other' on macOS Monterey and earlier) is a catch-all category that includes caches, logs, temporary files, Spotlight indexes, virtual memory swap files, and Time Machine local snapshots. It often grows to 20-50GB or more. Most of this data is safe to clean - it's regenerated by macOS and apps as needed.
How much free space should I keep on my Mac?
▾
Apple recommends keeping at least 35GB free for macOS updates. For optimal day-to-day performance, aim for at least 10-15% of your total drive capacity free. macOS uses free space for virtual memory, file indexing, and temporary operations - when free space drops below 10%, you'll notice significant slowdowns, failed app launches, and inability to install updates.
Why is 'Other' taking up so much space on my Mac?
▾
The 'Other' category (now called 'System Data' on macOS Ventura+) includes caches, logs, plugins, extensions, fonts, and any files macOS can't categorize into Apps, Documents, or Photos. Heavy apps like Xcode, Docker, Adobe CC, and browsers generate large caches that end up in this category. Clearing caches and removing app leftovers typically reduces 'Other' by 5-20GB.
How to check storage on Mac with Terminal?
▾
Open Terminal and run 'df -h /' to see total disk size, used space, and available space. For a more detailed breakdown by directory, use 'du -sh ~/Library/Caches' to check cache sizes, 'du -sh ~/Downloads' for Downloads, or 'du -sh ~/Library/Application\ Support/MobileSync/Backup' for iOS backups. Terminal provides exact byte counts without the rounding that System Settings uses.
Can I free up Mac storage without deleting files?
▾
Yes. Enable iCloud's 'Optimize Mac Storage' to offload old files to the cloud. Clear caches and temporary files - these aren't your personal files and are regenerated automatically. Delete Time Machine local snapshots. Remove app leftovers from previously uninstalled software. These methods can recover 10-30GB without touching any of your documents, photos, or personal data.
Checking your Mac's storage is easy - but understanding what's actually consuming space is where most people get stuck. macOS labels tens of gigabytes as 'System Data' without telling you what's inside. The five methods in this guide give you visibility into your storage, and the cleanup tips above can help you recover 10-30GB of wasted space. For the fastest results, DeepCleanMac scans 200+ hidden locations and shows you exactly what's recoverable - most users free up 15GB+ on the first scan. Download it free and see how much space your Mac is hiding.
Free download. Scans 200+ hidden locations in seconds.