How to Backup Mac to iCloud: Complete Guide (2026)
Quick Answer
Go to Apple menu > System Settings > [your name] > iCloud > iCloud Drive, turn on 'Sync this Mac,' and enable Desktop & Documents Folders. Files upload automatically and sync across all Apple devices. Free plan includes 5GB; iCloud+ starts at $0.99/month for 50GB.
Backing up your Mac to iCloud keeps your most important files safe and accessible from any Apple device. Unlike Time Machine (which creates a full system snapshot to an external drive), iCloud backup focuses on syncing your documents, photos, passwords, and settings to Apple's cloud servers. According to Apple, over 850 million users rely on iCloud for data protection. The setup takes under 5 minutes, but choosing what to sync - and making sure you have enough iCloud storage - requires a bit of planning. This guide walks you through every method, explains what iCloud does and doesn't back up, and shows you how to free up local storage so your backup runs smoothly. All steps are tested on macOS Sequoia (15), Sonoma (14), and Ventura (13).
5 Ways to Backup Your Mac to iCloud
Method 1: iCloud Drive - Desktop & Documents Sync
Step 1: Click the Apple menu () in the top-left corner of your screen.
Step 2: Select System Settings.
Step 3: Click your name (Apple ID) at the top of the sidebar.
Step 4: Click iCloud.
Step 5: Click iCloud Drive and make sure 'Sync this Mac' is turned on.
Step 6: Click the Options button next to iCloud Drive (or click 'Apps syncing to iCloud Drive').
Step 7: Enable Desktop & Documents Folders.
Step 8: Click Done. Files on your Desktop and in Documents will begin uploading to iCloud automatically.
Once enabled, files in Desktop and Documents exist in iCloud. If your Mac runs low on storage, macOS may offload older files to the cloud (keeping a placeholder icon locally). You can always re-download them by double-clicking.
Method 2: iCloud Photos - Photo Library Backup
Step 1: Open System Settings > [your name] > iCloud.
Step 2: Click Photos.
Step 3: Turn on 'Sync this Mac'.
Step 4: Choose between 'Download Originals to this Mac' (keeps full-resolution copies locally) or 'Optimize Mac Storage' (stores thumbnails locally, full files in iCloud).
Step 5: Wait for your library to upload. A progress bar appears in the Photos app under Library > All Photos.
iCloud Photos syncs your entire library - photos, videos, edits, albums, and Memories - across all devices. For large libraries (50GB+), the initial upload can take several hours or days depending on your internet speed. Keep your Mac plugged in and connected to Wi-Fi.
Method 3: iCloud Keychain - Passwords & Credentials
Step 1: Open System Settings > [your name] > iCloud.
Step 2: Click Passwords & Keychain.
Step 3: Turn on 'Sync this Mac'.
Step 4: Your saved passwords, credit card info, Wi-Fi networks, and passkeys will sync across all your Apple devices signed in with the same Apple ID.
iCloud Keychain uses end-to-end encryption - even Apple cannot read your passwords. If you use a third-party password manager (1Password, Bitwarden), you may want to disable iCloud Keychain to avoid duplicates.
Method 4: Mail, Contacts, Calendars & Notes
Step 1: Open System Settings > [your name] > iCloud.
Step 2: Click 'Show All' to see all available iCloud services.
Step 3: Enable each service you want to sync: Mail, Contacts, Calendars, Reminders, Notes, Safari (bookmarks and tabs).
Step 4: Each toggled service will immediately begin syncing existing data to iCloud.
These services use minimal iCloud storage (typically under 1GB combined for most users). Contacts and Calendars are especially important to sync - they're nearly impossible to recreate if your Mac is lost or damaged.
Method 5: Optimize Mac Storage - Automatic Space Management
Step 1: Open System Settings > [your name] > iCloud.
Step 2: Look for the 'Optimize Mac Storage' option under iCloud Drive settings.
Step 3: Enable it.
Step 4: macOS will automatically remove local copies of files you haven't opened recently, keeping only iCloud versions. Files appear in Finder with a cloud icon and download instantly when you open them.
Optimize Mac Storage is ideal for Macs with smaller SSDs (256GB or 512GB). It can free up 10-50GB by offloading old files to iCloud while keeping them accessible. Requires a reliable internet connection to re-download files on demand.
What iCloud Does and Doesn't Back Up
iCloud syncs specific data categories - it is not a full disk clone like Time Machine. Here's exactly what's included and what's not:
| Data Type | iCloud Backup Status |
|---|---|
| Desktop & Documents | Fully synced when iCloud Drive Desktop & Documents is enabled. Includes all file types - PDFs, spreadsheets, code projects, anything in these two folders. |
| Photos & Videos | Fully synced via iCloud Photos. Includes all photos, videos, Live Photos, edits, and albums. Often the largest portion of iCloud usage (20-100GB+). |
| Passwords & Keychain | End-to-end encrypted sync via iCloud Keychain. Includes passwords, passkeys, credit cards, and Wi-Fi networks. |
| Apps & System Settings | NOT backed up. Applications must be reinstalled from the App Store or developer websites. System preferences are partially synced (Wi-Fi, display settings) but not fully restorable. |
| Local Caches & Temp Files | NOT backed up and should not be. Caches, logs, and temporary files waste iCloud storage. These are regenerated automatically by macOS and apps. Clean them before backing up to avoid wasting your iCloud plan on junk data. |
| Time Machine Snapshots | NOT synced to iCloud. Time Machine and iCloud are separate backup systems. For full system recovery (apps, settings, everything), use Time Machine to an external drive alongside iCloud. |
How Much iCloud Storage Do You Need?
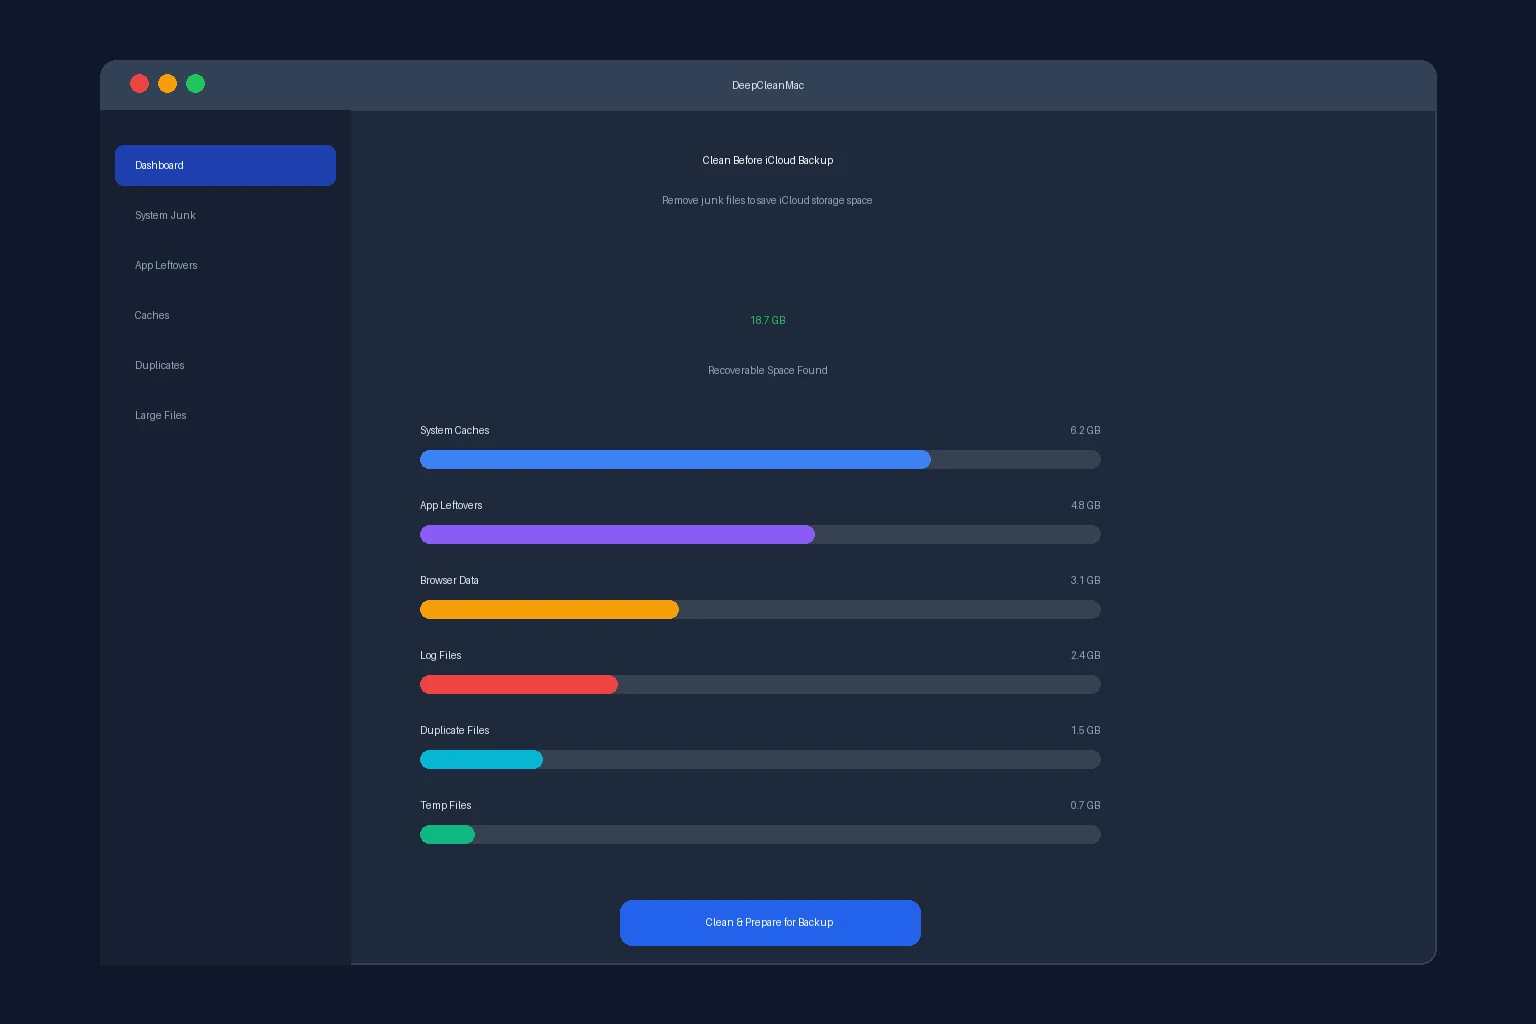
Apple provides 5GB of free iCloud storage - enough for contacts, notes, and passwords, but far too little for a real backup. According to Apple's own data, the average iPhone user stores 40-60GB of photos alone. Here's a realistic breakdown: Desktop & Documents typically uses 10-50GB depending on your workflow. Photos can range from 5GB to 200GB+. Mail usually stays under 5GB. Passwords and settings use negligible space. For most Mac users, the 200GB plan ($2.99/month) provides a comfortable buffer. Families or creative professionals with large photo/video libraries should consider the 2TB plan ($9.99/month). The key insight: don't pay to back up junk. System caches, old app leftovers, duplicate files, and temporary data can consume 15-30GB of your Mac's storage. If you back up without cleaning first, you're paying monthly to store files you don't need. A quick cleanup with DeepCleanMac before enabling iCloud sync ensures you're only backing up files that actually matter.
How to Prepare Your Mac Before Backing Up to iCloud
1. Clear system and app caches first
Caches in ~/Library/Caches can be 5-20GB of temporary files you don't need backed up. Clear them before enabling iCloud Drive sync so you don't waste storage on data that's regenerated automatically. See our guide on how to clear cache on Mac for step-by-step instructions.
2. Remove app leftovers from deleted apps
When you drag an app to Trash, its support files, preferences, and containers stay behind in Library folders - sometimes 500MB-2GB per app. These leftovers will sync to iCloud if they're in your Documents or Desktop. Remove them with a proper uninstaller first.
3. Delete duplicate files
Duplicate photos, downloaded files, and copied documents are common. Backing up duplicates means paying for iCloud storage twice for the same content. Scan for duplicates before syncing to maximize your storage plan value.
4. Move large files to an external drive
Video projects, virtual machines, and software archives can be 50-200GB. These are better stored on an external drive or dedicated cloud service (Google Drive, Dropbox) rather than consuming your iCloud plan. Keep iCloud for files you need on multiple devices.
5. Check what's in Desktop and Documents
When you enable Desktop & Documents sync, everything in those folders goes to iCloud - including random screenshots, temporary downloads, and forgotten zip files. Audit these folders first: move non-essential files elsewhere and keep only what you genuinely need backed up.
6. Use DeepCleanMac to clean before backup
DeepCleanMac scans 200+ hidden system locations and finds junk files, caches, app leftovers, and duplicates that waste storage. Run a scan before enabling iCloud sync to ensure you're only backing up meaningful data - most users recover 15GB+ that would otherwise consume their iCloud plan.
Clean First, Then Backup - How DeepCleanMac Helps
The biggest mistake users make when backing up to iCloud is syncing everything without cleaning first. Your Mac accumulates 10-30GB of junk files over time - caches, logs, app leftovers, duplicates, and temporary data scattered across 200+ hidden system locations. When you enable iCloud Drive sync, all of this junk gets uploaded and stored in your iCloud plan. You end up paying $2.99-$9.99/month to store files you'll never need again. DeepCleanMac solves this by scanning your Mac for recoverable junk before you back up. It identifies stale caches, orphaned support files, duplicate files, and oversized logs - then lets you review and remove everything safely. The result: a leaner Mac that backs up faster, uses less iCloud storage, and costs less to maintain. Run DeepCleanMac first, enable iCloud sync second. Your backup will be smaller, faster, and free of clutter.
Frequently Asked Questions About Mac iCloud Backup
Does iCloud backup everything on my Mac?
▾
No. iCloud syncs specific data - Desktop & Documents files, Photos, Passwords, Mail, Contacts, Calendars, Notes, and Safari data. It does not back up applications, system files, caches, or local settings. For a complete system backup that lets you restore your Mac exactly as it was, use Time Machine alongside iCloud. Think of iCloud as file sync and Time Machine as full system backup.
How much iCloud storage do I need to backup my Mac?
▾
Most users need 50GB ($0.99/month) to 200GB ($2.99/month). The free 5GB plan is insufficient for anything beyond passwords and contacts. Check your current usage at System Settings > [your name] > iCloud - the storage bar shows what's using space. If your Photos library alone exceeds 50GB, you'll need the 200GB or 2TB plan. Cleaning junk files before backing up can reduce your storage needs by 10-30GB.
Can I backup my Mac to iCloud without paying?
▾
You can sync limited data with the free 5GB plan - enough for Keychain passwords, Contacts, Calendars, Notes, and a few small documents. But 5GB is not enough for Desktop & Documents sync or Photos. If you want a meaningful backup without paying, combine the free iCloud tier (for passwords and contacts) with Time Machine to a free external drive for full system protection.
Is iCloud backup the same as Time Machine?
▾
No, they serve different purposes. Time Machine creates hourly snapshots of your entire Mac - every app, setting, and file - to an external drive. You can restore your Mac completely from Time Machine. iCloud syncs selected files and data to Apple's servers for cross-device access and protection against hardware loss. The best strategy is using both: Time Machine for full system recovery, iCloud for file access across devices and offsite protection.
How long does Mac iCloud backup take?
▾
The initial sync depends on your data size and internet upload speed. Typical times: 10-20GB takes 2-8 hours on a 10Mbps upload connection. 50-100GB can take 1-3 days. After the initial upload, only changed files sync - usually seconds to minutes. Keep your Mac plugged in, connected to Wi-Fi, and avoid sleeping it during the first sync. Check progress in System Settings > [your name] > iCloud.
Why is my iCloud backup stuck or not syncing?
▾
Common causes: insufficient iCloud storage (check Settings > iCloud), poor internet connection, Mac is asleep or on battery power, or a large file is blocking the queue. Fixes: 1) Check iCloud storage and upgrade if full. 2) Restart your Mac. 3) Sign out of iCloud and sign back in (System Settings > Apple ID > Sign Out). 4) Check Apple's System Status page for outages. 5) In Finder, look for files with a dotted cloud icon - these are queued for upload.
Can I restore my Mac from iCloud?
▾
Not fully. iCloud doesn't create a bootable system image like Time Machine. When you set up a new Mac, signing in with your Apple ID restores iCloud Drive files, Photos, Passwords, Contacts, and Calendars. But you'll need to reinstall all applications and reconfigure system settings manually. For complete Mac restoration (apps, settings, everything), you need a Time Machine backup. Use iCloud as a complementary layer for file protection and cross-device access, not as your sole backup.
Backing up your Mac to iCloud is one of the simplest ways to protect your files and keep them accessible across all your Apple devices. The setup takes under 5 minutes, and once enabled, your Desktop, Documents, Photos, and Passwords stay continuously synced without manual effort. The key to a successful iCloud backup: clean your Mac first. Removing caches, app leftovers, and duplicate files before syncing ensures you're not paying to store junk in the cloud. DeepCleanMac scans 200+ hidden locations and helps you recover 15GB+ of wasted space - making your iCloud backup smaller, faster, and more cost-effective. Download DeepCleanMac free, clean your Mac, then enable iCloud sync for a backup that only contains files you actually need.
Free download. Scans 200+ hidden locations in seconds.